Hit-Testing in iOS
Hit-testing is the process of determining whether a point, such as a touch-point intersects with a given graphical object presented on the screen, such as UIView. iOS uses hit-testing to determine which UIView is the frontmost view under the user’s finger that should receive the touch event. It implements it by searching the view hierarchy using a reverse pre-order depth-first traversal algorithm.
Before explaining how hit-testing works, it is important to understand when hit-testing is executed. The following diagram illustrates the high-level flow of a single touch, from the moment a finger touches the screen and until it is lifted from it:
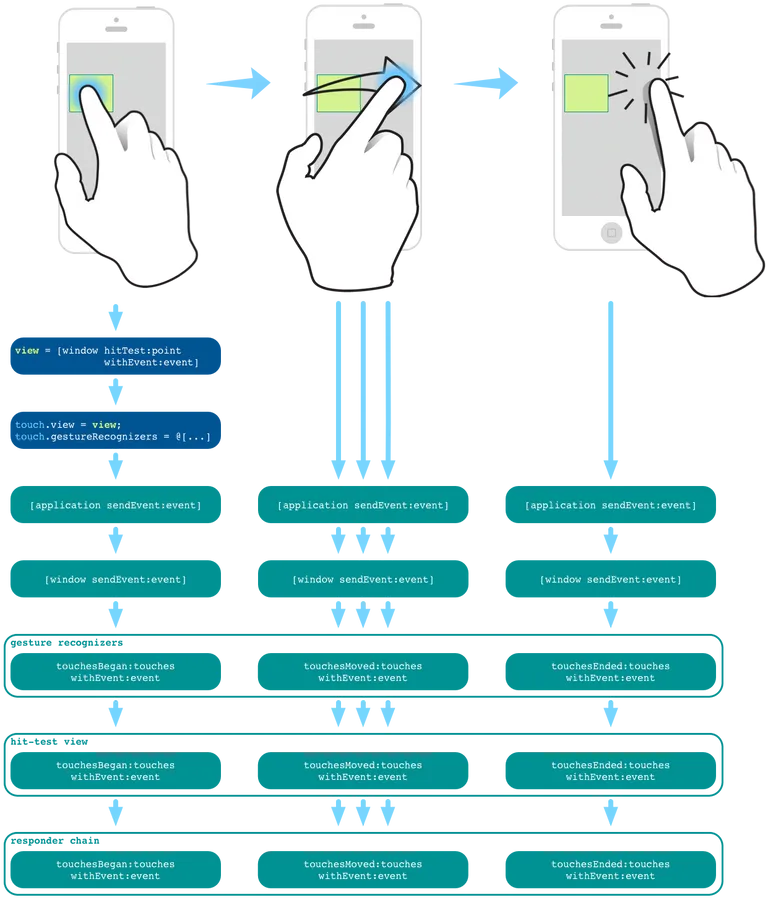
As illustrated in the diagram above, the hit-testing is executed every time a finger touches the screen. And, before any view or gesture recognizer receives the UIEvent object representing the event to which the touch belongs.
After hit-testing completes and the frontmost view under the touch-point is determined, the hit-test view is associated with the UITouch object for all phases of the touch event sequence (i.e., began, moved, ended, or canceled). In addition to the hit-test view, any gesture recognizers attached to that view, and its ancestor views are associated with the UITouch object. Then, the hit-test view begins receiving the sequence of touch events.
An important thing to note is that even if the finger is moved from the hit-test view bounds over another view, the hit-test view continues receiving all the touch events until the end of the touch event sequence:
“The touch object is associated with its hit-test view for its lifetime, even if the touch later moves outside the view.”\ Event Handling Guide for iOS, iOS Developer Library
As mentioned earlier, the hit-testing uses a depth-first reverse pre-order traversal algorithm. In other words, the algorithm visits the root node first and then traverses its subtrees from higher to lower indexes. This kind of traversal allows reducing the number of traversal iterations and stopping the search process once the first deepest descendant view that contains the touch-point is found. This is possible since a subview is always rendered in front of its superview, and a sibling view is always rendered in front of its sibling views with a lower index into the subviews array. When multiple overlapping views contain a specific point, the deepest view in the rightmost subtree will be the frontmost view.
“Visually, the content of a subview obscures all or part of the content of its parent view. Each superview stores its subviews in an ordered array, and the order in that array also affects the visibility of each subview. If two sibling subviews overlap each other, the one that was added last (or was moved to the end of the subview array) appears on top of the other.”\ View Programming Guide for iOS, iOS Developer Library
The following diagram shows an example of a view hierarchy tree and its matching UI drawn on the screen. The arrangement of tree branches from left to right reflects the order of the subviews array.
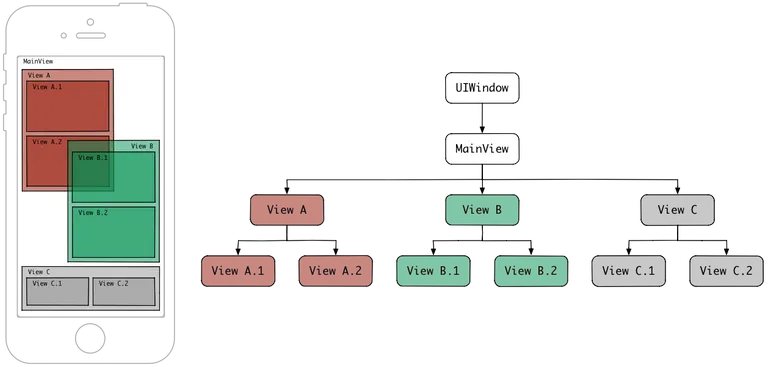
As it can be seen, “View A” and “View B” as well as their children, “View A.2” and “View B.1”, are overlapping. But since “View B” has a subview index higher than that of “View A”, “View B” and its subviews are rendered above “View A” and its subviews. Therefore, “View B.1” should be returned by hit-testing when the user’s finger touches “View B.1” in the area where it overlaps with “View A.2”.
Applying depth-first traversal in reverse pre-order allows stopping the traversal once the first deepest descendant view that contains the touch-point is found:
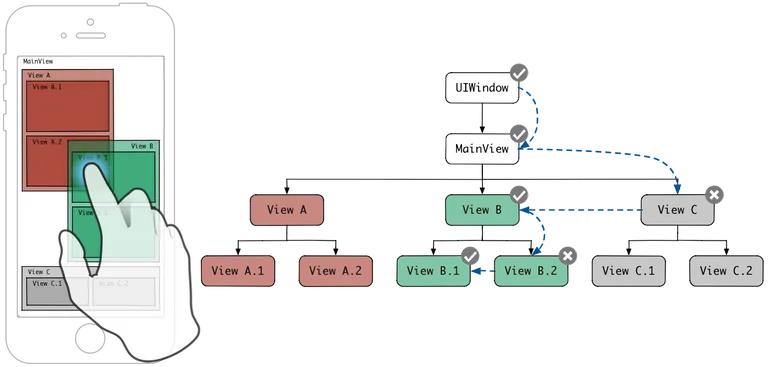
The traversal algorithm begins by sending the hitTest:withEvent: message to the UIWindow, which is the root view of the view hierarchy. The value returned from this method is the frontmost view containing the touch-point.
Following flow-chart illustrates the hit-test logic.
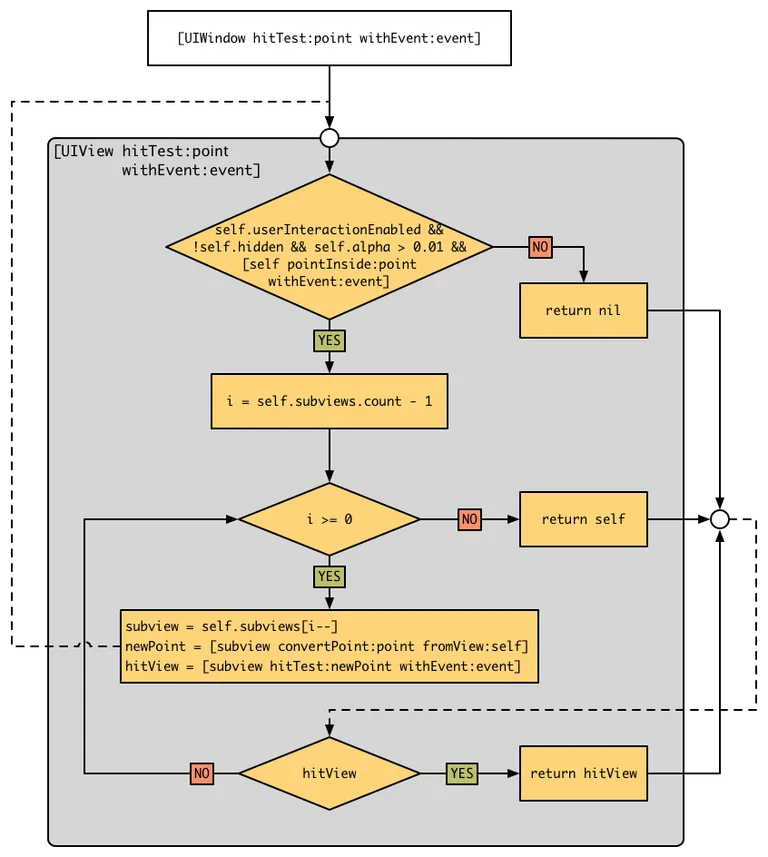
And the following code shows possible implementation of the native hitTest:withEvent: method:
- (UIView *)hitTest:(CGPoint)point withEvent:(UIEvent *)event {
    if (!self.isUserInteractionEnabled || self.isHidden || self.alpha <= 0.01) {
        return nil;
    }
    if ([self pointInside:point withEvent:event]) {
        for (UIView *subview in [self.subviews reverseObjectEnumerator]) {
            CGPoint convertedPoint = [subview convertPoint:point fromView:self];
            UIView *hitTestView = [subview hitTest:convertedPoint withEvent:event];
            if (hitTestView) {
                return hitTestView;
            }
        }
        return self;
    }
    return nil;
}
The hitTest:withEvent: method first checks if the view can receive the touch. A view is allowed to receive the touch if:
- The view is not hidden:\
self.hidden == NO - The view has user interaction enabled:\
self.userInteractionEnabled == YES - The view has alpha level greater than 0.01:\
self.alpha > 0.01 - The view contains the point:\
pointInside:withEvent: == YES
Then, if the view can receive the touch, this method traverses the receiver’s subtree by sending the hitTest:withEvent: message to its subviews from last to first until one of them returns non nil value. The first non nil value returned by one of the subviews is the frontmost view under the touch-point and is returned by the receiver. If all receiver subviews returned nil or the receiver has no subviews, the receiver returns itself.
Otherwise, if the view is not allowed to receive the touch, this method returns nil without traversing the receiver’s subtree at all. Therefore, the hit-test process may not visit all the views in the view hierarchy.
Common use cases for overriding hitTest:withEvent:
The hitTest:withEvent: method could be overridden when the touch events intended to be handled by one view should be redirected to another view for all phases of that touch event sequence.
Because the hit-test is executed before, and only before, the first touch event of the touch event sequence is sent to its receiver (the touch with the
UITouchPhaseBeganphase), overridinghitTest:withEvent:to redirect events will redirect all touch events of that sequence.
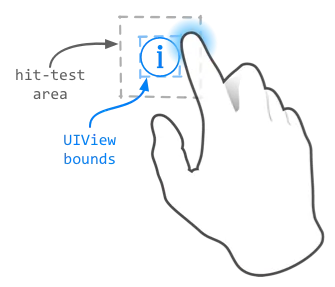
Increasing view touch area
One use case which could justify overriding the hitTest:withEvent: method is when the touch area of a view should be larger than its bounds. For example, the following illustration shows a UIView having a size of 20x20. This size may be too small to handle nearby touches. Therefore, its touch area may be increased by 10 points in each direction by overriding the hitTest:withEvent: method:
- (UIView *)hitTest:(CGPoint)point withEvent:(UIEvent *)event {
    if (!self.isUserInteractionEnabled || self.isHidden || self.alpha <= 0.01) {
        return nil;
    }
    CGRect touchRect = CGRectInset(self.bounds, -10, -10);
    if (CGRectContainsPoint(touchRect, point)) {
        for (UIView *subview in [self.subviews reverseObjectEnumerator]) {
            CGPoint convertedPoint = [subview convertPoint:point fromView:self];
            UIView *hitTestView = [subview hitTest:convertedPoint withEvent:event];
            if (hitTestView) {
                return hitTestView;
            }
        }
        return self;
    }
    return nil;
}hitTest:withEvent: method should also be overridden to include the desired touch area.Passing touch events through to views below
Sometimes a view must ignore touch events and pass them through to the views below. For example, assume a transparent overlay view above all other application views. The overlay has some subviews in the form of controls and buttons, which should respond to touches normally. But touching the overlay somewhere else should pass the touch events to the views below the overlay. To accomplish this behavior, the overlay hitTest:withEvent: method could be overridden to return one of its subviews containing the touch-point and nil in all other cases, including the case when the overlay contains the touch-point:
- (UIView *)hitTest:(CGPoint)point withEvent:(UIEvent *)event {
    UIView *hitTestView = [super hitTest:point withEvent:event];
    if (hitTestView == self) {
        hitTestView = nil;
    }
    return hitTestView;
}
Passing touch events to subview
Another use case is when a parent view must redirect all touch events to its only child view. This behavior may be desired when the child view partially occupies its parent view but should respond to all touches occurring in its parent. For example, assume a carousel of images that consist of a parent view and a UIScrollView with pagingEnabled set to YES and clipsToBounds set to NO to create a carousel effect:
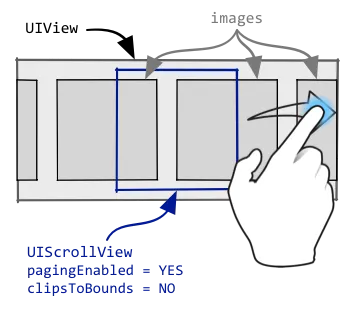
To make the UIScrollView to respond to touches occurring not only inside its own bounds, but also inside the bounds of its parent view, the parent’s hitTest:withEvent: method could be overridden in the following way:
- (UIView *)hitTest:(CGPoint)point withEvent:(UIEvent *)event {
    UIView *hitTestView = [super hitTest:point withEvent:event];
    if (hitTestView) {
        hitTestView = self.scrollView;
    }
    return hitTestView;
}